Creating Your First JavaScript Program
So far, JavaScript has probably lived in a console, or in a code editor's "Run" button — functions that return values, loops that print to a log, variables you inspect by hand. This tutorial takes everything you already know about JavaScript syntax and connects it to an actual web page for the first time: a small panel that greets you by name, lets you pick a color theme, and switches between light and dark mode — all with plain JavaScript, no frameworks, no build tools, nothing to install. By the end, you'll understand exactly how a line of HTML can trigger a JavaScript function, and you'll have a complete, working three-file project you built and understood line by line.
Prerequisites: This tutorial assumes basic JavaScript knowledge — you're
comfortable with variables (let, const), functions, and if/else, roughly what's
covered in Core JavaScript (ES6+).
You do not need to know anything about the DOM, events, or web pages yet — this
tutorial explains all of that from zero. Basic HTML and CSS (tags, attributes, a linked
stylesheet) also helps; see
Your First HTML + CSS Page if that part is new to
you.
In This Tutorial
- Understand what the DOM is and why JavaScript needs it to touch a web page
- Understand what an "event" is, in plain terms
- Bind JavaScript to HTML using attributes like
onclick,oninput, andonchange— the simplest possible way to connect the two, and the technique this entire tutorial uses - Select elements with
document.getElementById()and read/write them with.value,.textContent,.style, and.classList - Build and understand a complete three-file project:
index.html,style.css,script.js - See the finished result actually running, and get ideas to extend it yourself
Part 1: Two Big Ideas Before You Write Any Code
Everything in this tutorial rests on two ideas. Get these right, and the rest of the project is just applying them three times.
Idea 1: The DOM is the page, as an object JavaScript can touch
When a browser loads index.html, it doesn't just display the text — it builds a live,
in-memory model of the page, called the DOM (Document Object Model). Every tag
becomes an object: a <button> becomes a button object, an <input> becomes an
input object, and so on. Crucially, these objects are not frozen copies of your HTML —
they're the actual, live thing the browser is showing you. Change a property on one of
these objects from JavaScript, and the page visibly updates immediately, because you
didn't change "a copy" — you changed the real thing.
document is JavaScript's name for the whole page. document.getElementById("someId")
walks the DOM and hands you back the one live object whose id attribute matches — or
null if nothing matches. That's the entire mechanism this tutorial relies on: find the
object, then read or change one of its properties.
Idea 2: An event is "something happened," and an attribute can say what to do about it
A click is an event. So is typing a character into a text box, or choosing a different option in a dropdown. The browser is constantly watching for these and is happy to tell your code when one occurs — you just have to say which event you care about, on which element, and what function should run.
The simplest possible way to say that is to write it directly as an HTML attribute:
Read this exactly as it looks: "when this button is clicked, run the JavaScript
expression greetUser()." The attribute's name (onclick) tells the browser which
event to listen for, and its value is a string of real JavaScript — almost always just a
single function call — that runs when that event fires. This is called attribute-based
event binding, and it's what every interactive element in this tutorial uses:
onclick for buttons, oninput for a text field that reacts as you type, and
onchange for a dropdown that reacts when a new option is chosen.
Is this the only way to bind events?
No — there's a second, more powerful technique called addEventListener(), which
you'll meet properly in
Lecture 13: DOM Manipulation and Events.
It separates your JavaScript from your HTML entirely (an approach called
unobtrusive JavaScript) and lets one element respond to the same event in more
than one way. Attribute binding is simpler to read for a first project precisely
because the HTML and the behavior sit next to each other — that's exactly why this
tutorial starts here.
With those two ideas in hand — "the DOM is the live page as objects" and "an attribute can bind an event to a function call" — you already understand the mechanism behind every single interaction you're about to build.
Part 2: Set Up Your Project Folder
Create a new folder, and inside it, three empty files:
Link both files from the HTML's <head> and just before the closing </body> tag:
Two things worth noticing about where each tag goes, since both are deliberate:
- The stylesheet
<link>goes in<head>, before the page's content, so styles are known before the browser starts painting anything — this avoids a flash of unstyled content. - The
<script>tag goes at the very end of<body>, right before</body>closes. By the time the browser reaches that line, every element above it (the button, the input, the<select>) already exists in the DOM. If you put<script>in<head>instead, your JavaScript would try to run before those elements exist, anddocument.getElementById(...)would come backnullfor all of them.
Part 3: Build the Complete HTML
Here is the full index.html. Read through the three <section>s — each one is one
small, self-contained interaction, and each one binds exactly one event attribute.
<!DOCTYPE html>
<html lang="en">
<head>
  <meta charset="UTF-8">
  <meta name="viewport" content="width=device-width, initial-scale=1.0">
  <title>My First JavaScript Page</title>
  <link rel="stylesheet" href="style.css">
</head>
<body>
  <div class="container">
    <header>
      <h1>Welcome Panel</h1>
      <p class="subtitle">A page that reacts to you — built with plain JavaScript.</p>
    </header>

    <main>
      <section class="card">
        <h2>1. Say Hello</h2>
        <p>Type your name, then click the button.</p>
        <input type="text" id="nameInput" placeholder="Your name" oninput="updatePreview()">
        <p>Preview: <strong id="previewName">...</strong></p>
        <button onclick="greetUser()">Greet Me</button>
        <p id="greeting"></p>
        <p class="counter">Button clicked <span id="clickCount">0</span> times</p>
      </section>

      <section class="card">
        <h2>2. Pick a Theme</h2>
        <p>Choose a color to change this page's accent color.</p>
        <select id="themeSelect" onchange="changeTheme()">
          <option value="#2b2b7a">Indigo</option>
          <option value="#1f8a4c">Green</option>
          <option value="#c0392b">Red</option>
          <option value="#e67e22">Orange</option>
        </select>
      </section>

      <section class="card">
        <h2>3. Dark Mode</h2>
        <p>Toggle the whole page between light and dark.</p>
        <button onclick="toggleDarkMode()" id="darkModeBtn">Turn On Dark Mode</button>
      </section>
    </main>

    <footer>
      <p>Built with HTML, CSS, and plain JavaScript — no frameworks.</p>
    </footer>
  </div>

  <script src="script.js"></script>
</body>
</html>
Four things to notice before moving on:
- Every
idis the hook JavaScript uses to find that exact element.nameInput,previewName,greeting,clickCount,themeSelect, anddarkModeBtnall appear again inscript.jsinside adocument.getElementById(...)call — anidis nothing more than a label you've promised to keep unique on the page, specifically so code (yours or the browser's) can find that one element reliably. - Three different event attributes, for three different situations.
onclickfires once, immediately, when something is clicked — right for a button.oninputfires every single time the text inside a field changes, including mid-keystroke — right for a live preview.onchangefires when a<select>'s chosen option changes — right for "pick one of these options." <strong id="previewName">...</strong>is a separate, targeted spot for JavaScript to update — notice it's nested inside the<p>, not the whole paragraph, so updating it never has to touch the words "Preview:" next to it.<span id="clickCount">0</span>is the same idea applied to a running count: a tiny, specific element whose text JavaScript will replace, sitting inside a sentence that otherwise never changes.- Nothing has a value yet —
<p id="greeting"></p>is empty,clickCountstarts at literal0. The HTML describes the page's starting state; JavaScript's job is entirely about what happens after that, in response to events.
Part 4: Write the Complete JavaScript
Here is the full script.js. It's four small functions — one per id cluster above —
plus one variable they share.
// Keeps track of how many times the "Greet Me" button has been clicked.
let clickCount = 0;

// Called by the <input>'s oninput="updatePreview()" attribute every time
// the visitor types a character.
function updatePreview() {
  const input = document.getElementById("nameInput");
  const previewName = document.getElementById("previewName");
  const name = input.value;

  if (name === "") {
    previewName.textContent = "...";
  } else {
    previewName.textContent = name;
  }
}

// Called by the button's onclick="greetUser()" attribute.
function greetUser() {
  const input = document.getElementById("nameInput");
  const greeting = document.getElementById("greeting");
  const name = input.value.trim();

  clickCount = clickCount + 1;
  document.getElementById("clickCount").textContent = clickCount;

  if (name === "") {
    greeting.textContent = "Please type your name first!";
  } else {
    greeting.textContent = "Hello, " + name + "! Welcome to JavaScript.";
  }
}

// Called by the <select>'s onchange="changeTheme()" attribute.
function changeTheme() {
  const select = document.getElementById("themeSelect");
  const color = select.value;
  document.documentElement.style.setProperty("--color-primary", color);
}

// Called by the button's onclick="toggleDarkMode()" attribute.
function toggleDarkMode() {
  document.body.classList.toggle("dark-mode");
  const btn = document.getElementById("darkModeBtn");

  if (document.body.classList.contains("dark-mode")) {
    btn.textContent = "Turn Off Dark Mode";
  } else {
    btn.textContent = "Turn On Dark Mode";
  }
}
Walking through every function, in the order they appear:
updatePreview() — reading .value, writing .textContent
document.getElementById("nameInput") returns the live <input> object. A text
input's current typed content lives on its .value property — not its HTML (an
<input> has no closing tag and no inner text to speak of), but a property the browser
updates on every keystroke. Reading input.value gets you exactly what the visitor has
typed so far, at the exact moment this function runs.
previewName.textContent = "..." is the other direction: writing a property to
change what's on screen. .textContent sets an element's text content as plain text —
whatever string you assign becomes exactly what's displayed, with no interpretation of
special characters. This is the safest, simplest way to put text on a page from
JavaScript, and it's the only one this tutorial uses.
Why not build an HTML string instead?
You'll sometimes see code that sets .innerHTML to a string containing tags, which
lets you insert real markup (bold text, links, new elements) rather than plain text.
It's genuinely useful, but it means whatever string you assign gets parsed as
HTML — if that string ever came from someone other than the page's own visitor
(another user's comment, for example), that's a real security risk, because stray
< and > characters become real tags. .textContent never has this problem,
because it never parses anything — which is exactly why it's the right default
until you have a specific reason to reach for .innerHTML.
Because oninput fires on every keystroke, this function re-runs constantly while
you type — which is exactly what makes the preview feel "live" instead of updating only
after you click something.
greetUser() — combining values, updating three elements, basic string building
Three things happen here, in order:
- Read
input.value, then call.trim()on it — a built-in string method that removes leading/trailing whitespace, so a name typed as" Ali "is treated the same as"Ali". - Update the counter.
clickCountis declared once, at the very top of the file, withlet(notconst, since it needs to change) — and because it's declared outside any function, every function in this file can see and update the same variable. Each click adds1to it, then writes the new number into the<span>via.textContent. (Note:.textContenthappily accepts a number here too — JavaScript converts it to a string automatically when you assign it.) - Decide what to say, with a plain
if/else— empty name gets a gentle prompt, a real name gets a greeting built with string concatenation ("Hello, " + name + "! ..."), joining literal text and a variable's value into one final string.
Every one of those three steps is something you already knew how to do in a console — the only new part is which object's property you're reading from and writing to.
changeTheme() — one line that moves a CSS custom property
select.value works exactly like input.value did above, except for a <select>, it's
the value attribute of whichever <option> is currently chosen — in this case, a hex
color like "#1f8a4c".
document.documentElement is the DOM object for the page's root <html> tag — and
.style.setProperty("--color-primary", color) sets that one CSS custom property
directly on it, overriding the :root { --color-primary: ...; } value defined in
style.css. Because every other color rule in the stylesheet (the header background,
the buttons, the section titles) is written as var(--color-primary) rather than a
hardcoded color, changing this one property updates the whole page's accent color
instantly — no need to touch five different elements by hand.
toggleDarkMode() — the classList API
document.body is the DOM object for <body>. .classList is a built-in property
every element has, representing its class attribute as a toggleable set rather than a
single string you'd have to parse yourself:
.classList.toggle("dark-mode")adds the classdark-modeif the element doesn't have it yet, or removes it if it does — one call does both directions, which is why a single function handles turning dark mode both on and off..classList.contains("dark-mode")asks a yes/no question — is this class currently present? — which the function uses right after toggling, to decide whether the button should now say "Turn Off" or "Turn On."
The actual dark colors live entirely in style.css, in rules like
body.dark-mode { background-color: #1a1a22; }. JavaScript's only job here is adding or
removing one class name — CSS does the rest, which is the normal division of labor
between the two: JavaScript decides when something should change; CSS decides
what it looks like when it does.
Part 5: Style It With CSS
Here's the complete style.css. Nothing here is new if you've done CSS fundamentals —
the only JavaScript-relevant part is the dark-mode class rules at the bottom, which
simply don't apply until toggleDarkMode() adds that class to <body>.
:root {
  --color-primary: #2b2b7a;
  --color-bg: #f4f4f8;
  --color-card: #ffffff;
  --color-text: #333333;
}

* {
  box-sizing: border-box;
}

body {
  margin: 0;
  font-family: Arial, Helvetica, sans-serif;
  background-color: var(--color-bg);
  color: var(--color-text);
  transition: background-color 0.2s ease, color 0.2s ease;
}

.container {
  max-width: 560px;
  margin: 40px auto;
  background-color: var(--color-card);
  border-radius: 12px;
  box-shadow: 0 4px 16px rgba(0, 0, 0, 0.08);
  overflow: hidden;
}

header {
  background-color: var(--color-primary);
  color: white;
  text-align: center;
  padding: 32px 20px;
  transition: background-color 0.2s ease;
}

header h1 {
  margin: 0 0 6px;
}

.subtitle {
  margin: 0;
  opacity: 0.85;
}

main {
  padding: 28px;
}

.card {
  background-color: var(--color-bg);
  border-radius: 8px;
  padding: 18px 20px;
  margin-bottom: 20px;
}

.card:last-child {
  margin-bottom: 0;
}

.card h2 {
  margin-top: 0;
  color: var(--color-primary);
  font-size: 18px;
}

input[type="text"], select {
  width: 100%;
  padding: 8px 10px;
  font-size: 15px;
  border: 1px solid #ccc;
  border-radius: 6px;
  margin-top: 6px;
  box-sizing: border-box;
}

button {
  margin-top: 10px;
  padding: 10px 18px;
  background-color: var(--color-primary);
  color: white;
  border: none;
  border-radius: 6px;
  font-weight: bold;
  cursor: pointer;
  transition: background-color 0.2s ease, transform 0.2s ease;
}

button:hover {
  transform: translateY(-2px);
}

#greeting {
  font-weight: bold;
  min-height: 20px;
}

.counter {
  font-size: 13px;
  color: #777;
}

footer {
  text-align: center;
  padding: 16px;
  font-size: 13px;
  color: #777;
  border-top: 1px solid var(--color-bg);
}

/* Dark mode, toggled by JavaScript adding/removing this class on <body> */
body.dark-mode {
  background-color: #1a1a22;
  color: #eaeaea;
}

body.dark-mode .container {
  background-color: #26262f;
}

body.dark-mode .card {
  background-color: #1f1f28;
}

body.dark-mode input[type="text"],
body.dark-mode select {
  background-color: #2c2c38;
  border-color: #444;
  color: #eaeaea;
}

body.dark-mode .counter,
body.dark-mode footer {
  color: #999;
}
Notice the body.dark-mode .card selector style repeated several times: it means "any
.card that is inside an element matching body.dark-mode" — in other words, these
rules are completely inactive, matching nothing, until JavaScript's classList.toggle
call adds dark-mode to <body>. The moment it does, every one of these selectors
starts matching at once, which is why toggling dark mode changes five different parts of
the page (background, card color, inputs, counter text, footer text) from a single
classList.toggle() call.
Part 6: See It Running
Try it live
This project is deployed right here on the site — open the live demo in a new tab and play with it for real before (or instead of) typing it out yourself. It's the exact three files below, running with no build step of any kind.
Open index.html directly in your own browser once you've built it. Type a name, click
Greet Me a couple of times, switch the theme, and try the dark mode button — here's
what it looks like after typing a name and clicking Greet Me once:
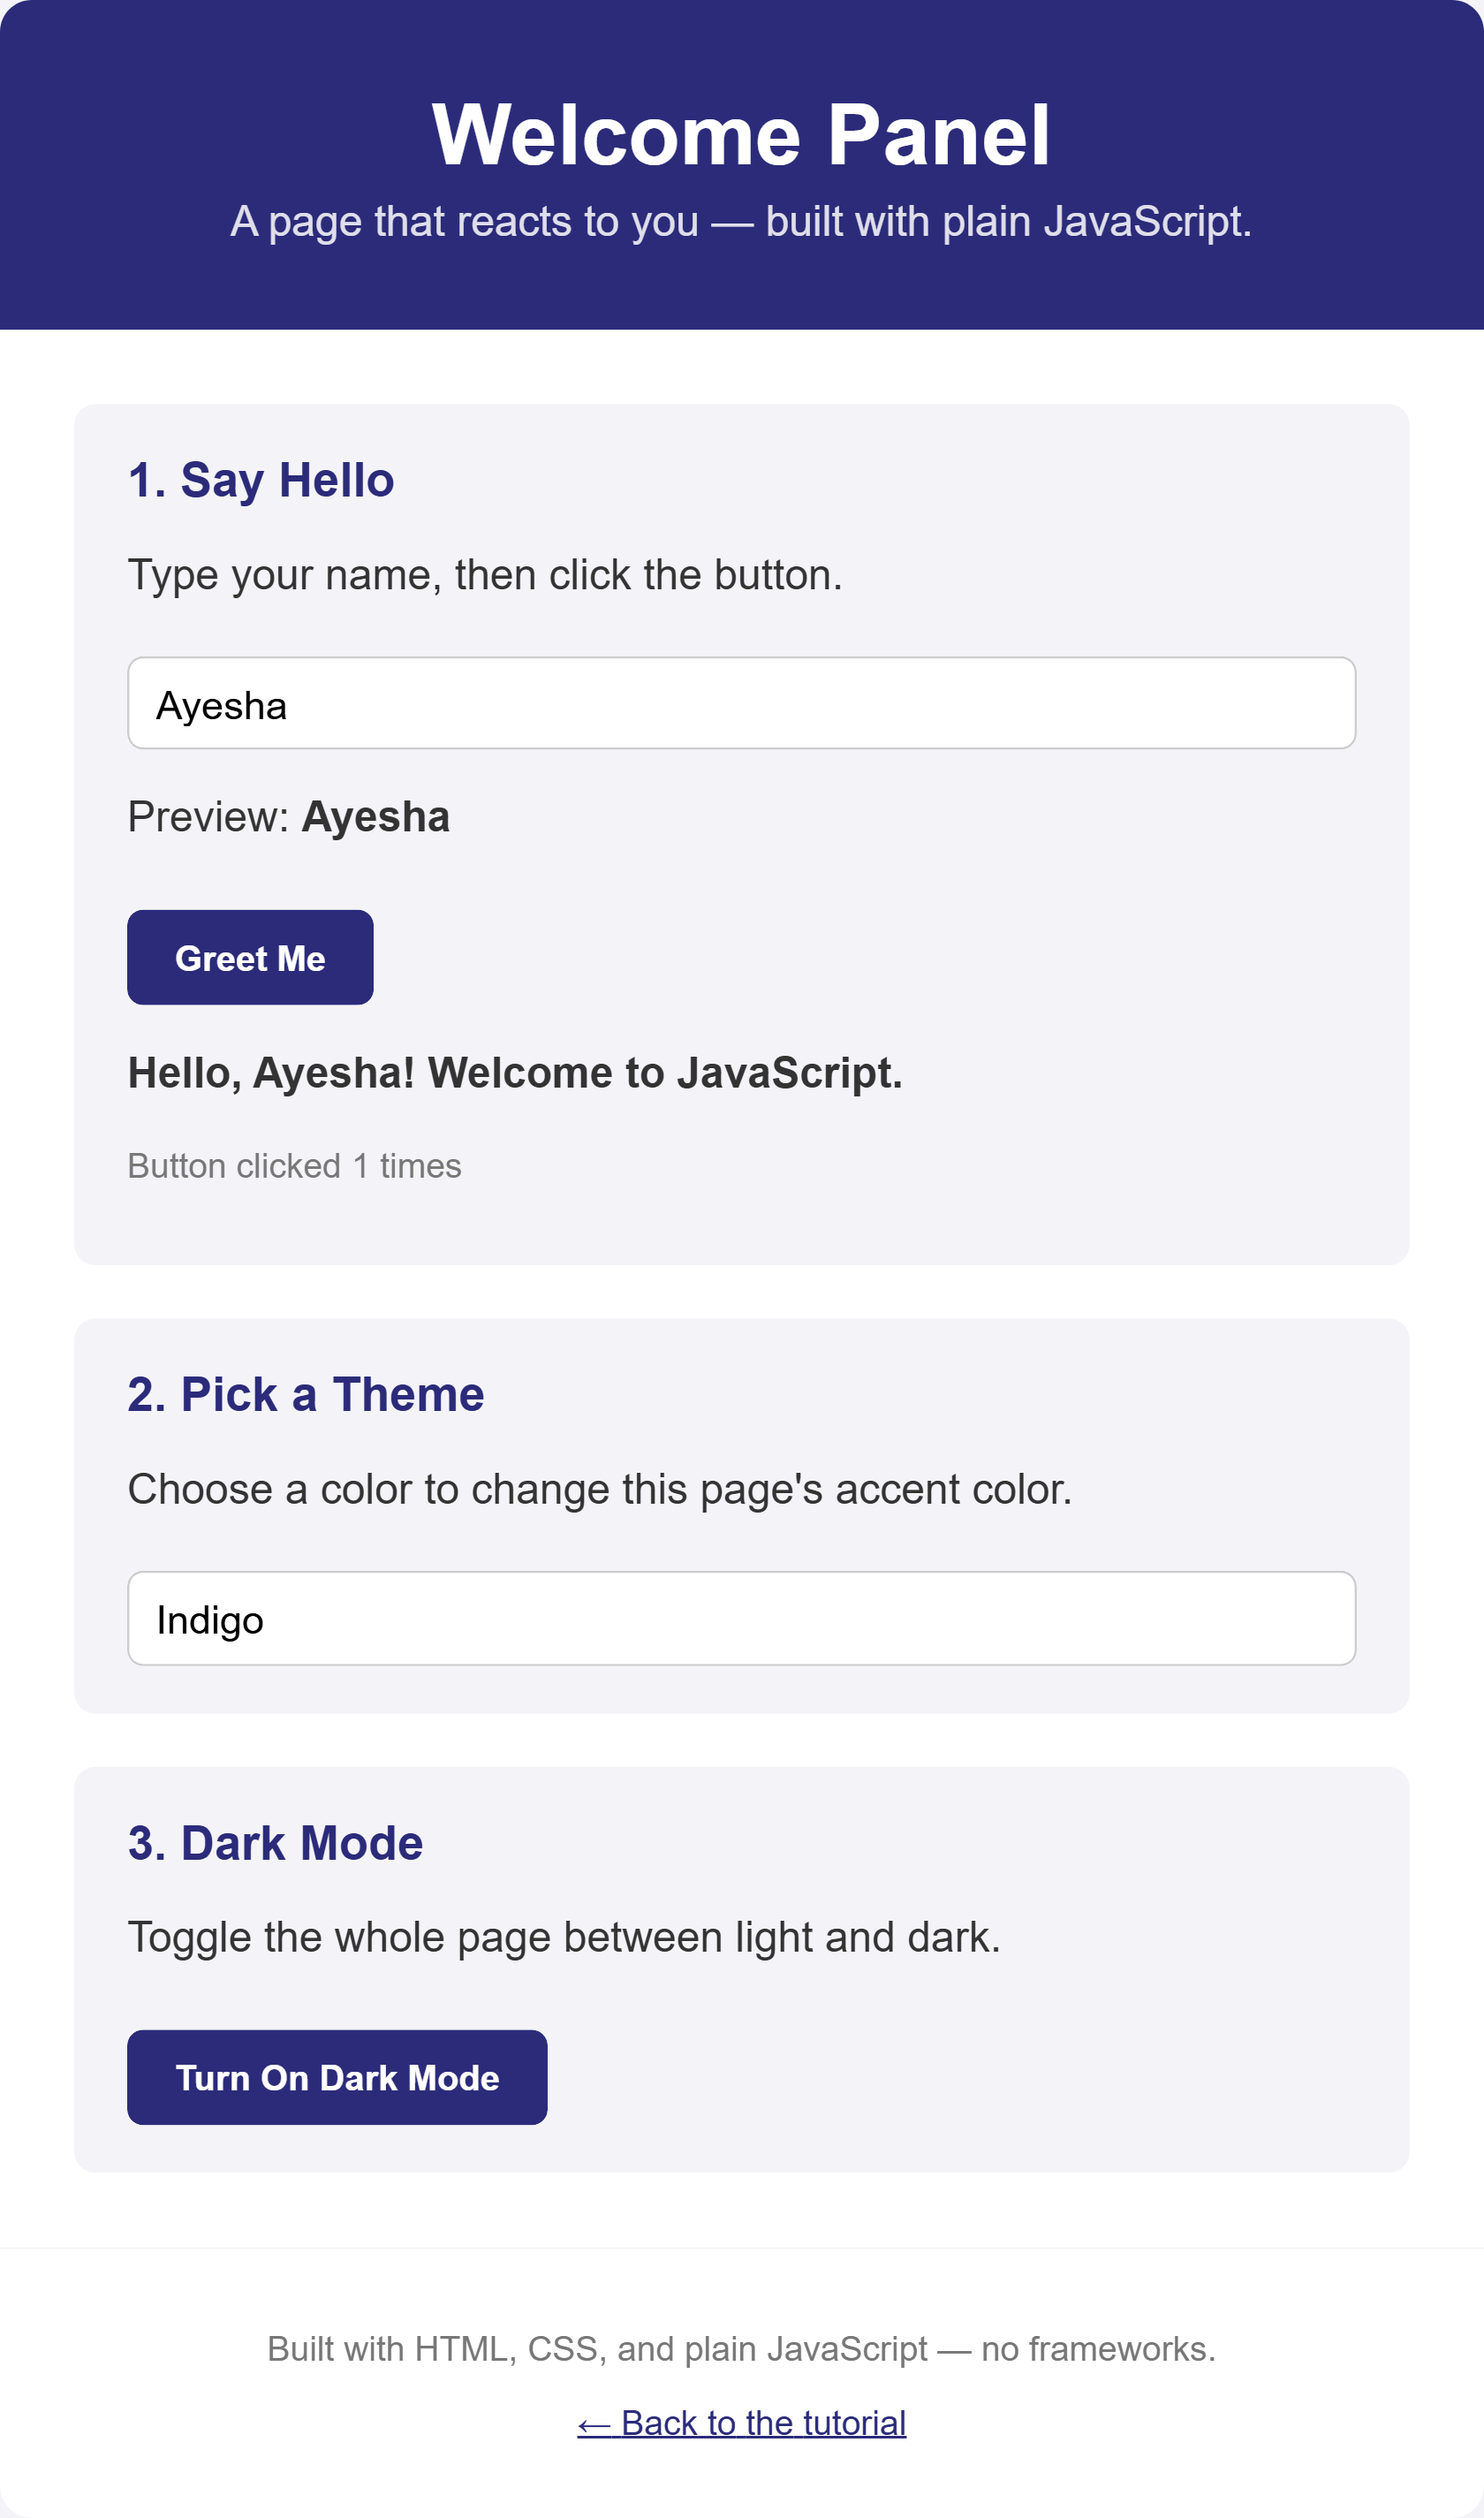
A still image can't show the live behavior, but in your own browser (or the live demo above) you'll see: the preview text updating on every keystroke (before you even click anything), the click counter incrementing on each click, the header and buttons instantly switching color when you pick a different theme, and the whole page smoothly fading between light and dark when you toggle dark mode — all driven by the four small functions above, each one triggered purely by an HTML attribute.
Try It Yourself
- Add a fourth interaction: a button with
onclick="resetAll()"that clears the name input, resets the preview to"...", clears the greeting, and setsclickCountback to0. (Hint: you'll needinput.value = ""to clear a text field, which is just the write-direction of the same.valuepropertyupdatePreview()already reads.) - Add a second
<select>for font size (Small / Medium / Large, with values like"16px","20px","26px") bound with its ownonchange, and a second CSS custom property (--font-size-heading) thatheader h1uses — following the exact same patternchangeTheme()already uses for color. - Make the click counter say something different at round numbers — e.g. if
clickCountis a multiple of 5 (clickCount % 5 === 0), show"Wow, " + clickCount + " clicks!"instead of the normal greeting. - Add a
maxlength="20"attribute to the name<input>, then updateupdatePreview()to show how many characters are left — e.g."Preview: Ayesha (15 left)"— using20 - name.length.
Key Takeaways
- The DOM is the live, in-memory version of your page that JavaScript can read from and
write to —
document.getElementById("id")is how you get hold of one specific piece of it. - An HTML attribute like
onclick="functionName()"is the simplest way to connect an event (a click, typing, choosing an option) to a JavaScript function — the attribute's value is just the JavaScript expression that runs when the event fires. .valuereads/writes a form element's current content,.textContentsafely reads/writes an element's plain text, and.classList.toggle()/.contains()add, remove, and check CSS classes — three small APIs that, combined, cover most of what a first interactive page needs.- JavaScript decides when something should change (in response to an event); CSS
decides what it looks like once it has — toggling one class name can restyle five
different parts of a page at once, because the rules for what
dark-modelooks like already live instyle.css, waiting to apply. - This tutorial deliberately used attribute binding everywhere, for clarity — when
you're ready for
addEventListener()and the unobtrusive-JavaScript approach it enables, Lecture 13 picks up exactly where this tutorial leaves off.